Showing posts with label Badges and Banners. Show all posts

Monday, 12 June 2017

Badges & Banners #wwys120

http://whatwillyoustamp.blogspot.com.au/
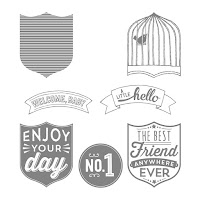
Welcome to another week of What Will You Stamp? To participate in this week's challenge and to see all the great projects from the Design team using this set be sure to visit the What Will You Stamp? Challenge Blog or simply click the photo below. This week we were challenged to use the Badges & Banners Stamp set.
 
I have created this fun card using just pretty much just 1 stamp from the set. I stamped out 23 badges in Calypso Coral (x8), Blushing Bride (x8) & Rose Red (x7). It was fun yet relaxing stamping, punching and adhering to the card front. I think they look a bit like the tops of the building in the Red Square! 

I did trim the last row so I could layer it to the Whisper White Frame & 'A little hello' to finish it all off with some gold thread. 


Try making this card! 
  • Cardbase in Calypso Coral cardstock
  • A4 cut in half @ 14.9cm [5-7/8"]
  • Scored @ 10.5cm [4-1/8"] 
  • Front:
  • Whisper White Frame 9.8 x 14.3 [3-7/8" x 5-5/8"] 
  • Blushing Bride Panel 9.5 x 14cm  [3-3/4" x 5-1/2"]
  • Stamp & cut x23 badges with Best Badge Punch
  • Starting from the top adhere first row and continue downwards row by row.
Love the colour combination? Pin and share it. 

Thanks so much for stopping by. I hope you enjoyed seeing my project please leave me a comment I'd love to hear what you think! Now, get stamping and submit your project over at WWYS#120
https://feedburner.google.com/fb/a/mailverify?uri=CarolinaEvans-StampinUpDemonstratorMelbourneAustraliahttp://www3.stampinup.com/ECWeb/default.aspx?dbwsdemoid=4005871https://ida.stampinup.com/?demoid=4005871https://www3.stampinup.com/ECWeb/ItemList.aspx?categoryid=300100&dbwsdemoid=4005871
Stampin' Up! Supplies - click to view online
     Badges & Banners          Best Badges Punch          Gold Metallic Threads 


Remember to use the HOST code PA6HCATM so you can receive a special thank you gift!
 

Friday, 15 July 2016

Shaving Cream - A Marble Look

Welcome back for another project! This card is being featured in an International showcase of projects over at our wonderful Mentor's blog - thank you so much Kylie Bertucci you truly awesome.
This weeks theme is #frommetoyouwhenyourefeelingblu A card can make such a difference to someone especially if they are feeling blue. I love the smile a simple card can bring and the heartfelt love you can give from a simple gesture. I also know that its equally kind to say thanks to those that care for you when you are down and I know exactly who I am going to send this card to!
I'd love for you to vote for my project - click here to submit your vote
 
Do you believe I made the background pattern on this card - its not DSP! After I created the background panel, I didn't want to cover it up too much so I have kept it quite simple.  I used ht Shaving Cream technique to create this marble look.
This technique is really easy- a little messy but very fun! 
  • Simply spray some shaving cream on a washable surface (old plastic mat works super)
  • Add some drops of Ink from your reinkers 2-3 drops per colour is plenty 
  • Swirl the colours around with a skewer/stick
  • Place your whisper white cardstock directly over the foam, press down to cover space
  • Lift and wipe or squeegee off the excess foam & ta-dah!
 Card measurements:
  • Aussie C6 card base in Rich Razzleberry cardstock (half A4)
  • Crumb Cake Frame 3-3/4" x 5-1/2"
  • Whisper White Panel 3-5/8" x 5-3/8"
     
     Be inspired with this colour combination, feel free to share and pin it!

    Thanks so much for stopping by. I hope you enjoyed seeing my project please leave me a comment I'd love to hear what you think!  Be sure to check out the rest of the AMAZING projects from all over the world! Click here.

    http://feeds.feedburner.com/CarolinaEvans-StampinUpDemonstratorMelbourneAustraliahttp://www3.stampinup.com/ECWeb/default.aspx?dbwsdemoid=4005871www3.stampinup.com/ECWeb/CategoryPage.aspx?categoryid=120700&dbwsdemoid=4005871https://ida.stampinup.com/?demoid=4005871

    Stampin' Up! Supplies - click to view online
    www3.stampinup.com/ECWeb/ProductDetails.aspx?productID=141610&dbwsdemoid=4005871www3.stampinup.com/ECWeb/ProductDetails.aspx?productID=131162&dbwsdemoid=4005871
    www3.stampinup.com/ECWeb/ProductDetails.aspx?productID=142334&dbwsdemoid=4005871 www3.stampinup.com/ECWeb/ProductDetails.aspx?productID=138392&dbwsdemoid=4005871

Monday, 25 April 2016

NEW!! 2016-2018 In Colours

It is so exciting when we get to introduce to you the new In Colours (colors)! At OnStage it was mentioned that these colours were not created to work all together. For the most part they do, but we can't forget our other Family colours - the Brights, Subtles, Regals and Neutrals. I'm certain these new colours will work well with these too. Did you know that each year Stampin' Up! create their own new colours, they almost always show in the Top Panetone Colours which really determines the hip and funky colours that we will see in design and fashion.
Now I understand you may not be a fan straightaway but let me woo you. To decorate these cards I used The Mixed Boarders greetings & a new stamp from Badges and Banners. I've also used a NEW DSP Stack called Playful Palette (coming June 1st pg 174 of the new catalogue) its has 4 of the new In Colours and the designs are fabulous!
Peekaboo Peach
Flirty Flamingo
Emerald Envy 
 Sweet Sugarplum
 Dapper Denim

You can make these cool cards with little supplies - photos to come!
- Playful Palette DSP Stack 141657
- InColour A4 Assortment 141434
Plus these new Stamp sets

Be inspired with this colour combination, feel free to share and pin it!


Thanks so much for stopping by. I hope you enjoyed seeing my projects please leave me a comment I'd love to hear what you think!