Showing posts with label 2015-2017 In Colours. Show all posts

Wednesday, 13 January 2016

Cute Hello Card in Cucumber Crush for #GDP018

Today's card is all about celebrating this warm weather we have been having this summer (down here in Oz). Although it has been on and off, hot, cold, rainy, sunny, windy, muggy - consider that a good day in the city of Melbourne - better known as '4 Seasons in one day' - and its no joke- that's a true fact!  I do enjoy our summer times, it means chill out time, relaxing holidays with our boys and that is always a great thing. I have used the new 'Project Life Memories in the Making' stamp set to create this funky Cucumber Crush card. As always the design team over at the Global Design Project have come up with another beauty of a challenge #GDP018
http://www.global-design-project.com/2016/01/global-design-project-gdp018.html
Here is my card! I deviated from the sketch in a couple of ways. I lengthened the square piece to a rectangle and shifted the circle all the way over the right to highlight a little 'hello'. I tried it in the middle of the card but it looked too balanced - a wanted a edgy look.
I hope you can see the shimmer I have added to the green circles using the new Wink of Stella Clear Glitter Brush - its amazing and is now a staple ingredient to all my cards from now on!
Try making this card! Here are the measurements for you:
  • Aussie C6 card base in Whisper White Thick cardstock
  • Cucumber Crush Frame 3-3/4" x 5-1/2"
  • Whisper White Panel 3-1/2" x 5-1/4"
Be inspired with this colour combination, feel free to share and pin it!

Stampin' Up! Supplies
Built for Free Using: My Stampin Blog
Thanks for stopping by and thank you for all your friendly and cute comments!

Monday, 14 September 2015

Cottage Greetings - Spring Inspired for #GDP002

I enjoyed stamping all those little flowers on my Basic Gray card for the Global Design Project #GDP002 that I wanted to remake it with a touch of Spring. This time with some nice bright colours! What could be more perfect than the NEW Incolors themselves.

Just to remind you this weeks challenge is a Sketch design by Teneale Williams.
Here is my card! This time I have used the sentiment from 'Endless Wishes' stamp set, and the silver sequins are from the embellishments in the 'Cottag Garden' card kit. Again I've used one of the wooden embellishments in the 'Watercolour Wishes ' card kit - this time a cute butterfly.

Here's a closer look at the pattern I created just with 3 little stamps.

My C.O.L moment of the day (Cry Out Loud!) - yup I had glued it all upside down!
 Here are the card measurements so you too can create this card:
  • Standard Australian C6 card base in Cucumber Crush Cardstock (half A4 sheet)
  • Whisper White Frame - 3-3/4" x 5-1/2"
  • Cucumber Crush Panel - 3-5/8" x 5-3/8"
  • Strips - Watermelon Wonder - 3-1/2" x 1-1/2"
  • Strips - Dijon & White - 3-1/2" x 1" (glued slightly overlapped)
  • Circles cut with Circle Framelits (#6 from middle) & 2-1/2" Circle punch
If you love this colour combination too, please feel free to share and pin it!

Stampin' Up! Supplies
Built for Free Using: My Stampin Blog
Thanks for stopping by and thank you for all your wonderful encouraging comments!
http://www.global-design-project.com/

Sunday, 9 August 2015

Happy Notes - Moving Card #PP262 #FabFri70

We took a lovely walk up to the You Yangs today with the kids and I knew we would return after dark. So cheeky me took my card on the trip and while it was still daylight I took some photos.
A family member recently moved house so this card is going to be perfect for them.

Here's how I created it... (card measurements are detailed further down in this post!)
I stamped the backgound with Tip Top Taupe ink with the dot image from 'Work of Art' - love this!
Next I used my Stampin' Write Markers to colour the very cute and heavily loaded car image from 'Happy Notes' onto the white piece - the sentiment comes as part of the car image stamp and because I wanted a bit of space inbetween so I could add my lovely Pool Party cotton ribbon, I stamped them separately - coloured and stamped the car first, then cleaned my stamp, then coloured and stamped my sentiment further down the paper.

I bet you're asking what I used to create the cute corners? Well I'm excited to say that available soon in the Holiday Catalogue (Sept 1st 2015) you will see the 'Curvy Corner Punch'. 1 punch with 3 designs! I have used 2 here the scalloped edge and the double curve. The other design is a ribbon slide.

 Layer all the pieces together with dimensionals, add some ribbon and a cute button and we're done.!
 Here are the card measurements so you too can create this card:
  • Standard Australian C6 card base in Tip Top Taupe Cardstock (half A4 sheet)
  • Mint Macaron Frame - 3" x 5"
  • Pool Party Frame -  2-1/2" x 4-1/2"
  • Whisper White Panel - 2" x 3-1/2"
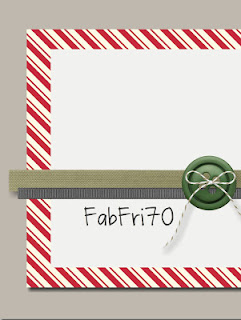
 My card is inspired by 2 challenges, here are the inspirational pics from Pals Paper Arts 262 & Fab Friday 70
http://www.palspaperarts.com/2015/08/ppa262-a-color-challenge.html

http://fabfridaystampinchallenge.blogspot.com.au/2015/08/fab-friday-70.html
I've added this colour swatch that features the colours on my card. Please feel free to pin it to your pinterest boards!
Stampin' Up! Supplies
Built for Free Using: My Stampin Blog
Thanks for stopping by today

Monday, 29 June 2015

Watercolour Wings in Watermelon Wonder for JAI#268

I should know by now that even though not everything I see (in the catalogue) appeals to me straight away I will eventually grow to love it! The Watercolour Wings set was one I looked at, pondered over but thought "nah I'm not going to like that!" But how could I be so silly!! Its a beautiful 2, even 3 step stamping set and its gorgeous! Its on page 75 of the Catalogue.
I'd like to thank my 5 year old son, Gabriel for choosing the colours for this card! Genuis! Thanks beautiful!
I'm loving this new Brick wall embossing folder too, so funky, I cut out a few bricks to make it a little more realistic and sponged a bit of Soft Suede ink over it. I didn't want to hide the 'brick wall'with another big rectangular piece so I added a long thin banner in watermelon wonder. I created a quick flag from the Cherry Cobbler Striped Ribbon which is lovely and vibrant. Lastly a new PUNCH has been added to my collection - the WASHI punch - I will be using this one lots I can see! Here is my card...
How I stamped the butterfly:
Base layer - Watermelon Wonder stamped off once
Wing Edges - Watermelon Wonder full colour strength
Centre Details & Dots - Cherry Cobbler full colour strength
Here is the inspirational sketch from the lovely design team over at Just Add Ink Sketch #268
http://just-add-ink.blogspot.com.au/2015/06/just-add-ink-268-sketch.html
No post is quite complete without a little photo-bombing from "Mr Marco" & his Octonauts!
Love the colours on this card? Pin this to your Pinterest Colour Board!
Stampin' Up! Supplies
Built for Free Using: My Stampin Blog
Thanks for stopping by today

Thursday, 18 June 2015

Mojo Monday Challenge #402 - Project Life Moments Like These

I'm pretty slack at printing off photos, surely I'm not the only one? It was something I was meant to get better at this year! So instead of using my Project Life kit for memory keeping I have used the beautifully designed cards to create todays card, which I entered into this weeks Mojo Monday #402 Challenge.

Here is the inspiration sketch by the very talented Julee Tilman
http://mojomonday.blogspot.com.au/2015/06/mojo-monday-402.html

Mojo Monday Blinkie

And here is my Project Life card....
I really love all the Project Life kits - the colours Moments Like These are just gorgeous - I think Watermelon Wonder is my new favourite colour?

 I've added this colour swatch featuring the colours used in my card. Please feel free to pin it to your pinterest boards!
Stampin' Up! Supplies
Built for Free Using: My Stampin Blog
Thanks for stopping by today

Sunday, 7 June 2015

Just Add Ink Challenge #265 - Hey Girl

I have a confession! I could't help but think of a Ryan Gosling when I was making this card as it features the new stamp set 'Hey Girl' which has nothing to do with him at all! However the memes on the internet of him are just too cute to ignore.  
Todays card is inspired by the talented designers over at Just Add Ink #265. I've created a fun girly card with lots of balloons - as this was part of the inspirational picture. I love this new stamp set. Its a photopolymer so lining up all the images was just a breeze!
I did a lot of fussy cutting!! lots! The bow in her hair, the gold balloons, the top and frills in her dress too!
For her hair I used Delightful Dijon and Hello Honey markers and the NEW Lots of Label framelits for the greeting! You'll also see here I layered her dress just for a bit of added dimension. 
 

Here is the inspirational picture Just Add Ink Sketch

http://just-add-ink.blogspot.com.au/2015/06/just-add-ink-265-inspiration-image.html

 Oh why not include this here right!!??

I've added this colour swatch that features the colours on my card. Please feel free to pin it to your pinterest boards!

Stampin' Up! Supplies
Built for Free Using: My Stampin Blog
Thanks for stopping by today

Saturday, 23 May 2015

The Crazy Crafters May Blog Hop - Sneak Peek theme

Welcome to another Crazy Crafters Blog Hop! This months theme is all about some of the new products that were available on a super special Sneak Peek just for demonstrators.  All the new products go live on June 2nd, so be sure to hop over to my online store so you can see all the amazing new items - this is the best catalogue I've seen in my 5 years with SU.

I have created a few cards today using the Layered Letters Alphabet Photopolymer stamp set.  It has so many uses too. I love how with the clear photopolymer sets you can see what you're inking and stamping - below you'll see a cool tip from me.
I've also joined the latest craze and made a carry bag for my cards - which is in the shape of a handbag! Its really easy - I have adjusted the measurements for Australian C6 cards - I saw the idea from Linda Bauwin - really cool!!

Here are my creations...
 
For more info on this card - click here

Love this bag!! To make this size bag you will need half a sheet of  dsp (6x12")
x3 - 3/4 x 12" carstock (rims)
x2 - 3/4 x 10" carstock (handles)
x1 - 2 1/2 x 5 1/4"" carstock (base, scored at 1/2" around to make a base)
Carolina's Tip's and Techniques
I used some of the other letters and characters in the alphabet set to create the extra little pieces on my Hungry Caterpillar - the letter 'V' for the antennae, the exclamation dot '!' for the nose, and the letter 'I' for the legs - here's how...
Clear view of what I'm inking makes making other shapes easy!
 

Please leave me a comment I'd love to hear what you think
Up next we have Sue Wdowik, hop on over to see her beautiful creations.


Stampin' Up! Supplies
Built for Free Using: My Stampin Blog